Pests and Diseases
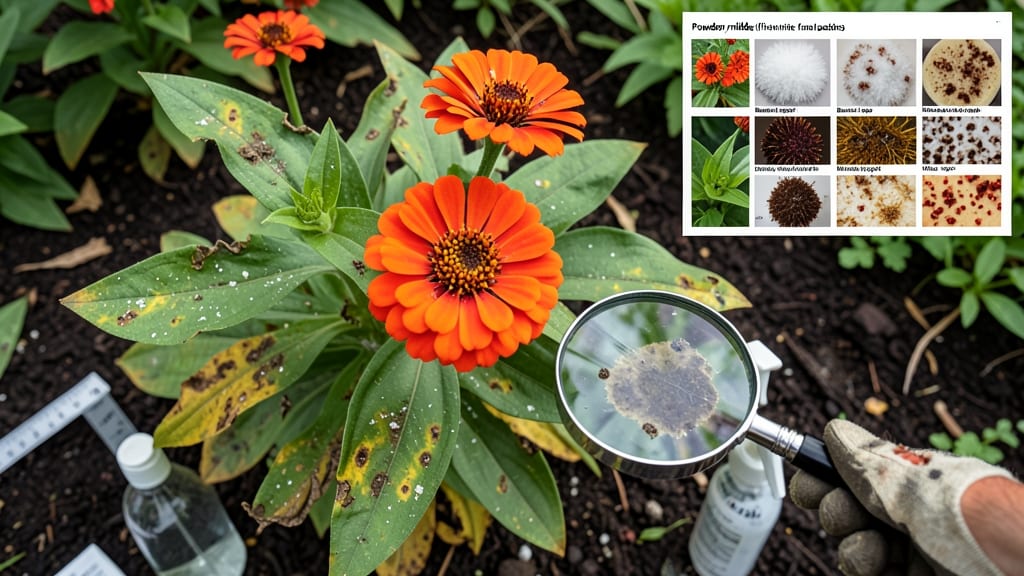
Those zinnia leaf problems—those unsightly brown spots on your zinnias—aren’t just ruining the show; they’re a red flag. 🌿 Fungal diseases like powdery mildew or bacterial leaf spot turn vibrant blooms into a sad, spotted mess, but I’ve learned how to diagnose and cure them fast with simple tools you likely already have.
The first step is identifying the culprit: powdery mildew leaves a white, dusty coating, while bacterial spots create water-soaked brown patches. Overhead watering or crowded plants often trigger these issues, but don’t panic—copper spray or neem oil can stop them in their tracks within 7-10 days of consistent treatment.
Once you’ve got the right diagnosis, you’ll see your zinnias bounce back with bold, healthy foliage and those showstopping blooms you planted for. The key is acting fast—before the disease spreads to your other flowers—and keeping the area well-ventilated to prevent future outbreaks.
This method works for zinnias in garden beds, containers, or even window boxes. With the right approach, you’ll have those spot-free, thriving zinnias back in no time—no fancy tools required.
📚 In This Guide
- What you need
- Instructions
- Tips and common mistakes
- Wrapping up and next steps
What you need
- ● Zinnias (or suspected infected plants) – Healthy or affected plants for inspection.
- ● Hand lens or magnifying glass – A 10x magnification lens works best for spotting tiny details.
- ● Pruning shears or sharp scissors – Sterilized with rubbing alcohol (70% isopropyl) to prevent cross-contamination.
- ● Disposable gloves – Nitrile gloves (for chemical safety) or latex-free options.
- ● Spray bottle (16 oz capacity) – For applying homemade or store-bought sprays.
- ● Copper fungicide – Choose a ready-to-use liquid (e.g., Copper Sulfate or Copper Hydroxide) or a powdered form (mix with water as directed).
- ● Watering can or hose with adjustable nozzle – For rinsing leaves or diluting sprays.
- ● Plastic tray or bucket – To mix homemade sprays or collect pruned foliage.
- ● Labeling tags or markers – To mark treated vs. untreated plants for tracking progress.
- ● Trash bag or compost bin – For disposing of severely infected leaves (do not compost diseased plant matter).
- ● Digital camera or smartphone – To document symptoms before/after treatment.
- ● pH testing kit – To check soil pH (ideal range for zinnias: 6.0–7.0).
- ● Neem oil or horticultural oil – As a preventive measure against pests/diseases.
- ● Fungicide sprayer (backpack or handheld) – For larger gardens or heavy infestations.
- ● Safety goggles – If handling concentrated copper solutions.
Diagnosing and treating zinnia leaf problems with copper spray
Zinnia leaves can show distress from fungal infections or environmental stress—here’s how to spot the issue and treat it effectively.
🌿 Step 1: Identify the Problem on Zinnia Leaves
Start by examining the leaves closely for specific signs. Powdery mildew appears as white, powdery patches on leaf surfaces, while rust shows up as orange-brown spots with pustules on the undersides. Bacterial leaf spot creates small, water-soaked lesions that turn brown or black with yellow halos.
Check the undersides of leaves first—many fungal issues start there. If you see dark, greasy spots with yellow borders, that’s likely alternaria leaf spot, a common zinnia problem. Compare your findings to trusted plant disease guides to confirm the issue before treating.
✂️ Step 2: Prune Infected Leaves Immediately
Use clean, sharp pruners to remove any leaves showing signs of disease. Cut back to healthy tissue—never leave infected areas behind, as they’ll continue spreading spores. Dispose of the pruned leaves in the trash (not compost) to prevent reinfection.
Focus on lower leaves first, as they’re often the most affected. If the problem is severe, you may need to remove up to 30% of the foliage to restore air circulation. This step alone can stop the spread before you even apply treatment.
💧 Step 3: Apply Copper Spray for Prevention and Treatment
Mix a copper fungicide spray (like copper sulfate or copper hydroxide) according to package instructions—typically 1 tablespoon per gallon of water. Apply in the early morning or late afternoon to avoid leaf burn from sunlight. Use a handheld sprayer for even coverage.
Spray until the leaves are damp but not dripping, focusing on both upper and lower surfaces. Copper works by disrupting fungal and bacterial cell walls, so reapply every 7-10 days or after heavy rain. Always wear gloves and protective eyewear when handling copper sprays.
☀️ Step 4: Adjust Growing Conditions to Prevent Recurrence
Zinnia leaf problems often stem from poor air circulation or excessive moisture. Space plants 12-18 inches apart to improve airflow, and avoid overhead watering—water at the base instead. If your garden stays damp, consider adding 2-3 inches of mulch around plants to reduce soil moisture.
Ensure zinnias get 6-8 hours of full sun daily—shady conditions weaken plants, making them more susceptible to disease. If humidity is high, a fan on low speed near the plants can help dry leaves faster after watering.
⏰ Step 5: Monitor and Retreat as Needed
Check plants every 3-4 days for new signs of disease. If spots reappear, repeat the copper spray treatment. For severe cases, alternate with a neem oil spray (1 teaspoon per quart of water) for added protection.
Healthy zinnias should show new growth within 7-10 days of treatment. If no improvement occurs after two weeks, the issue may be environmental (like nutrient deficiency) rather than fungal—test soil pH and adjust fertilizing accordingly.
Tips & tricks for diagnosing zinnia leaf issues
A few key insights can transform your zinnia care from guesswork to confident problem-solving.
Disease Identification: When examining leaves in Step 1, use a magnifying glass to spot subtle differences between fungal spots. Powdery mildew leaves a chalky residue when rubbed, while rust creates raised pustules that release orange spores. For bacterial spots, look for water-soaked edges that eventually develop a greasy sheen—this helps distinguish them from environmental stress marks.
Pruning Precision: In Step 2, sterilize your pruners with rubbing alcohol between cuts to prevent cross-contamination. For severe cases where you remove up to 30% of foliage, focus on the oldest leaves first—they're most vulnerable. Remember, removing healthy leaves weakens the plant, so always cut back to the first visible healthy node.
Copper Spray Application: The 1 tablespoon per gallon ratio in Step 3 is your baseline, but for heavily infected plants, you can safely double the concentration temporarily. When spraying, work in a shaded area to prevent leaf burn, especially during the recommended early morning or late afternoon timing. A fine mist nozzle ensures better coverage than a stream.
Environmental Adjustments: The 12-18 inch spacing in Step 4 isn't just about airflow—it creates a microclimate that reduces humidity around leaves. For container-grown zinnias, consider using terracotta pots which naturally wick moisture away from roots. A small oscillating fan on low speed near your plants can mimic natural breezes and speed up drying after watering.
Pro Tips for Zinnia Leaf Problems
- A few key insights can transform your zinnia care from guesswork to confident problem-solving.
- Disease Identification: When examining leaves in Step 1, use a magnifying glass to spot subtle differences between fungal spots.
- Pruning Precision: In Step 2, sterilize your pruners with rubbing alcohol between cuts to prevent cross-contamination.
Frequently asked questions
Got zinnia leaf problems?
Here are answers to the most common questions gardeners ask—so you can diagnose issues fast and keep your zinnias blooming beautifully!
Why are my zinnia leaves turning yellow?
Yellowing leaves are often caused by overwatering or nutrient deficiencies (like nitrogen). Check soil moisture—zinnias prefer well-draining soil. If roots are soggy, reduce watering. Yellowing at the edges may signal magnesium deficiency; apply Epsom salt (1 tbsp per gallon of water) as a foliar spray. Pro tip: Rotate plants for even sunlight exposure.
How do I tell if zinnia leaf spots are fungal vs. bacterial?
Fungal spots (like Alternaria or Septoria) are tan/brown with yellow halos and often appear on older leaves. Bacterial spots (e.g., Xanthomonas) are water-soaked, greasy-looking, and dark with yellow borders. Fungal spots may have fuzzy mold underneath. Test: Scrape a spot—if it’s slimy, it’s bacterial. Act fast: Remove infected leaves immediately.
When is the best time to apply copper spray for zinnia leaf problems?
Apply copper fungicide (like copper sulfate or copper hydroxide) at the first sign of disease—don’t wait for spots to spread! The best times are:
Yes! Prune infected leaves immediately with sterilized shears (wipe with rubbing alcohol). For severe cases:
Try these DIY remedies for mild issues:
Reapply every 7–14 days or after heavy rain. Safety tip: Wear gloves and avoid spraying when bees are active.
Can I save my zinnias if the leaves are already covered in spots?
If >50% of the plant is affected, consider removing it entirely to protect nearby flowers. Prevention: Rotate crops next season—don’t plant zinnias in the same spot yearly.
What are some natural alternatives to copper spray for zinnia leaf problems?
Warning: Test sprays on a small leaf first—some plants are sensitive!
Wrapping up and next steps
Zinnia leaf problems don’t have to be a gardener’s nightmare—with the right diagnosis and a little copper spray action, your plants can bounce back stronger than ever! 🌱 From fungal spots to pesky pests, understanding the signs and acting fast keeps your zinnias thriving.
Remember, prevention is key, so stay vigilant and keep your garden healthy.
Ready to give your zinnias the care they deserve? Start by inspecting your plants weekly and apply your homemade copper spray at the first sign of trouble. Happy gardening! 🌸